 Example System / ONVIF Implementation FAQ
Can you teach how to implement ONVIF protocol
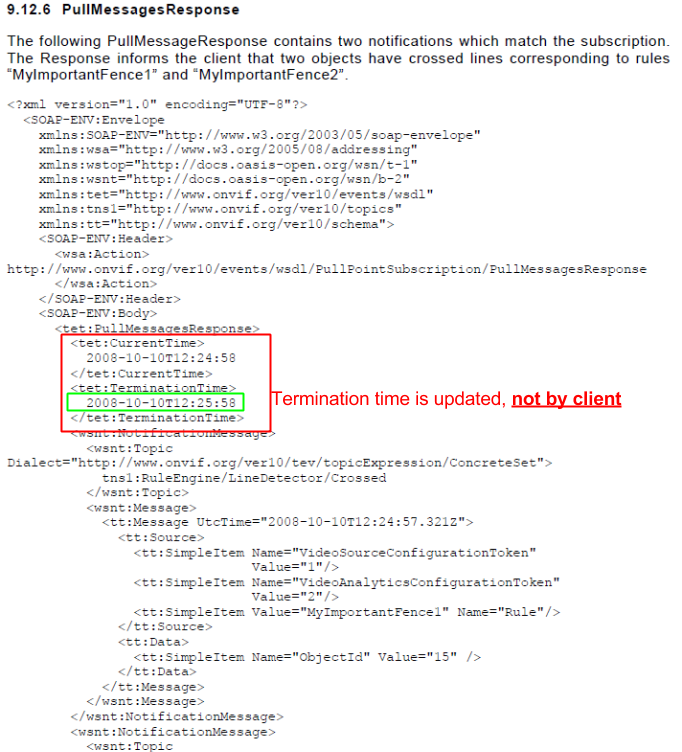
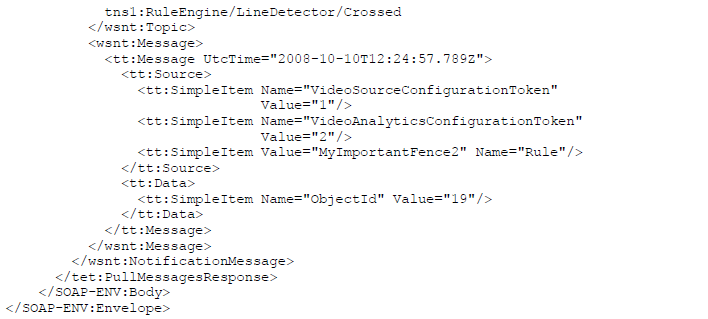
Can you provide detailed XML dialog as an implementation example
What is Event Template and why is it needed
What ONVIF specs are referenced?
How should I treat the implementation hints
What is the "Channel" parameter of the NVR software
What is the initial camera attaching sequence
How to implement dual-streaming
How to implement configuring of VideoEncoderOptions (Resolution, Codec, FrameRate etc)
How to implement configuring of ImagingOptions (Brightness, Saturation, etc)
How to support event notification under ONVIF spec
Does Genius Vision NVR supports basic notification
How to implement ONVIF Pull-point style event notification (ET01)
How to implement MotionAlarm event (ET01)
Introduction of Property in spec
What is a Synchronization Point
Does the NVC (client) need to send SetSynchronizationPoint explicitly
What does it really mean by Synchronization Point, I still don't understand
If NVC doesn't need to send SetSynchronizationPoint, then what's the point of having such a command
What is notification streaming interface?
How to implement Digital Input (ET01)
Reflecting digital input state change
How to implement Relay Output (ET01)
What is the InitialTerminationTime issue
Can you teach how to implement ONVIF protocol
Teaching or walking-through the detailed ONVIF implementation is really outside the scope of our free ONVIF verification service.
However, if you want, you can hire us to be your consultant to do this, but hiring us is not free. For more information, please refer to our official Consultancy page.
In other parts of this document, we have already provided many implementation hints. You should be able to extrapolate the information you need from these hints, but please be aware these hints are not officially supported.
Can you provide detailed XML dialog as an implementation example
See also
What is Event Template and why is it needed
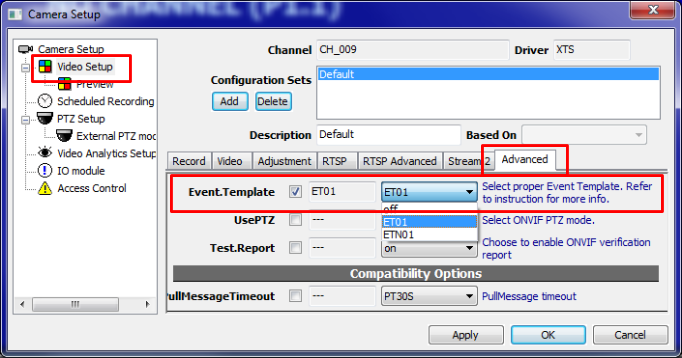
Event Template is a parameter defined by Genius Vision to remedy the fact that some parts of ONVIF are vague or not clear enough about actual implementation of event notification mechanism. This, in reality, causes the developers to imagine and implement ONVIF in several slightly different ways and thus won't interoperate altogether.
As one of our principals stated, and because no specs are perfect that are without flaws or contraditions, we created this additional parameter in order to workaround such spec issues and provide several alternative implementation to accomodate these compatibility issues.
The summarized definitions of each Event Template can be looked-up here.
Following is an example of how to configure Event Template for a particular NVR channel.
What ONVIF specs are referenced?
- ONVIF-Imaging-Service-Spec-v221.pdf
- ONVIF-Core-Specification-v230.pdf
- ONVIF-DeviceIo-Service-Spec-v221.pdf
How should I treat the implementation hints
Terms & conditions
To spare camera developers the efforts from having to look around & search in the dozens of ONVIF specs using our professional knowledge, we have put some implementation note in this document. However, you need to understand the following rules before reading these notes:
- The implementation hints are not supported. The support effort is subject to consultant service which is available only through our distributor and require paying fees.
- There is no guarantee of any accuracy indicated in the implemenation hints. Use on your own risk.
- ONVIF verification should not be done by interpreting XML or "test report". Rather, it should be done manually & visually by operating the software and the camera and see if they interoperate as expected. Many camera ONVIF deficiencies are known to be caused by programmer's reliance on "test tools". One should not let machine to do what was meant for people's responsibility, especially when a programmer knows how to "cheat" the test-tool. Please read this article for more info.
- Implementation hints does not substitute ONVIF spec in anyway. We still believe the best way to understand ONVIF is simply to read the specs and get very familarized with them.
- If you need to test a working software, you're welcomed to download our software from our Free ONVIF Verification portal, for evaluation purpose.
- For the actual spec documents referenced, please refer to What ONVIF specs are referenced?
XML namespaces
- Except for additionally described, all XML namespace prefix definitions used in the XML examples are consistent with ONVIF-Core-Specification-v230.pdf, 5.3 Namespaces.
Legends
- In the XML example, if you see this green-highlighted text, it means you must substitute the highlighted text into programmatic or proper value.
- The "<ver20/imaging>GetOptions" is a short-hand notation, meaning it refers to the GetOptions command of Imaging service 2.0, and it's actually different from Imaging service 1.0. This notation is required to clearly express the XML namespace changes among spec versions, especially from 1.0 to 2.0. For more details please refer to this technical article: What does ONVIF version 1.0, 1.1, 1.2, 2.0 generally means? Why version 1.0, 1.1, 1.2, 2.0 can be incompatible?
- The bold black text, depending on context, such as "GetProfiles" usually means a command name defined ONVIF spec, where bold green text, such as "Channel" usually means an internal NVR variable or configurable parameter used to determine the actual software behavior.
If I'm going to use Genius Vision NVR to verify my camera, what basic knowledge should I have for this software?
Please refer to following link for a short version of Genius Vision NVR manual for ONVIF self-verification.
What is the "Channel" parameter of the NVR software
Channel is a NVR channel configuration parameter (as illustrated by the image below), which identifies the video source of a potentially multi-channel device. Normally the value is "1" and it means the first video source. If you change it to "2", it will select the second video source, and etc.

In the terminology of ONVIF, this mostly means that among the video sources returned by GetVideSources, only that matches what is specified by Channel will be used, while among profiles returned by GetProfiles, only the profiles matching the aforementioned video source will be used.
What is the initial camera attaching sequence
Warning! This is an implementation hint article. Read this first.
Calling sequence
- Calls <device>GetCapabilities to obtain device capabilities and various endpoints
- Calls GetVideoSources to obtain a list of video sources. For one channel in Genius Vision NVR, only one video source will be used and it's determined by the Channel parameter (explained here) in NVR. Channel of value "1" designates the first video source, etc.
- Calls GetProfiles to obtain a list of media profiles. Each profile token will be listed in the available stream selection of Genius Vision NVR. Please note only those profiles matching the designated video source (as specified by Channel) will be used.
- Calls <ver20/imaging>GetOptions to obtain supported imaging options, if this call fails, the NVR will try to call <ver10/imaging>GetOptions instead. At this moment, an automatic protocol version detection of imaging service is performed and result is stored to an internal variable called ImagingVersion. The result of available imaging option will be listed on NVR.
- Compare NVR imaging settings against the camera settings (using the result of GetProfiles), the NVR will determine a list of imaging parameters that needs to be changed, and then calls <ver20/imaging>SetImagingSettings, or <ver10/imaging>SetImagingSettings, depend on ImagingVersion.
- Calls GetVideoEncoderConfigurationOptions for each stream configured. Available options will be listed on the NVR.
- Compare NVR video encoder settings against the camera settings (using the result of GetProfiles). NVR will then determine a list of video encoder settings that needs to be changed, and then calls SetVideoEncoderConfiguration.
- Calls GetStreamUri to obtain media URI, in order to get audio/video streaming, then use the designated parameter to invoke RTSP.
Mandatory commands summary
From the above we can understand that in order to properly support Genius Vision NVR, following ONVIF commands need to be implemented, but not all of them are mandatory. The mandatory commands are:
- <device>GetCapabilities - mandatory
- GetVideoSources - mandatory
- GetProfiles - mandatory
- GetStreamUri - mandatory
Optional commands summary
Lacking support of some commands will causes disabling of some NVR functions, but it can still work as a ordinary video camera:
- <ver20/imaging>GetOptions or <ver10/imaging>GetOptions - optional. Lacking support for this command causes NVR to disable all ImagingOptions functions.
- <ver20/imaging>SetImagingSettings or <ver10/imaging>SetImagingSettings - optional. Lacking support for this command causes NVR to disable all ImagingOptions functions.
- GetVideoEncoderConfigurationOptions - optional. Lacking support for this command causes NVR to disable all VideoEncoderOptions functions.
- SetVideoEncoderConfiguration - optional. Lacking support for this command causes NVR to disable all VideoEncoderOptions functions.
How to implement dual-streaming
Warning! This is an implementation hint article. Read this first.
To understand this part, please read the following hint first:
For ONVIF dual-streaming, Genius Vision NVR will call GetProfiles to obtain a list of supported media profiles. Each profile token will be listed in the stream selection of Genius Vision NVR. To support dual-streaming, at least two profiles must be supported. Please note only those profiles matching the designated video source (as specified by Channel, explained here) will be used.
How to implement configuring of VideoEncoderOptions (Resolution, Codec, FrameRate etc)
Warning! This is an implementation hint article. Read this first.
To understand this part, please read the following hint first:
To support configuring of VideoEncoderOptions, following commands must be supported by the camera:
- GetProfiles
- GetVideoEncoderConfigurationOptions
- SetVideoEncoderConfiguration
How to implement configuring of ImagingOptions (Brightness, Saturation, etc)
Warning! This is an implementation hint article. Read this first.
To understand this part, please read the following hint first:
To support configuring of ImagingOptions, following commands must be supported by the camera:
- GetProfiles. The existence of each value under the returned by the matching Profile/VideoSource/Imaging (including BacklightCompensation, Brightness, ColorSaturation, Contrast, Exposure, Focus, IrCutFilter, Sharpness, WideDynamicRange, WhiteBalance, etc) determines if that value is can be used in NVR client.
- <ver20/imaging>GetOptions or <ver10/imaging>GetOptions
- <ver20/imaging>SetImagingSettings, or <ver10/imaging>SetImagingSettings
How to implement PTZ
Warning! This is an implementation hint article. Read this first.
Calling sequence
- Check the NVR configuration parameter UsePTZ to see if PTZ is enabled. If not enabled, entire PTZ function initialization is skipped. The setting of UsePTZ will also be used to determine if version 1.0 or verision 2.0 of ONVIF PTZ will be used to communicate with the camera.
- Calls <ver20/ptz>GetPresets or <ver10/ptz>GetPresets (depend on the value of UsePTZ) to get a list of PTZ presets.
- If mouse PTZ operation is commenced, calls <ver20/ptz>ContinuousMove or <ver10/ptz>ContinuousMove (depend on the value of UsePTZ) to engage PTZ moving operation.
- If preset-goto operation is commenced, calls <ver20/ptz>GotoPreset or <ver10/ptz>GotoPreset (depend on the value of UsePTZ) to engage PTZ preset-goto operation.
How to support event notification under ONVIF spec
There are generally two ways to support event notification, as defined in ONVIF spec
- Basic notification
- Pull-point style notification
Due to the reasons stated here, Genius Vision NVR does not support basic notification. So you should use pull-point style notification only, in order to pass our verification.
P.S. According to the spec, there is actually a third way to support event notification using RTP, but since we haven't seen any vendor has supported it, we won't be able to support it.
See also
Does Genius Vision NVR supports basic notification
No.
Basic notification, as defined in ONVIF spec, only applies IP camera and NVR in the same network segment. The notification will not be able to be transmitted if the camera is on the Internet and NVR is inside an NAT. This call-back style requirement also potentially requires the user to turn off any firewall mechanism that might exist, even in production stage.
The limitation & requirements introduced by basic notification will likely to cause extreme confusion when problems arise in the field, and it's very difficult to sort out the cause of problem in short time or in an obvious way. In practical sense, using basic notification will significantly increase the support cost to all roles of IP video deployment, including system integrators, VMS software developers, and IP camera manufacturers. In contrast, pull-point style notification does not have these problems.
Therefore, we believe that using real-time pull-point style notification is the most appropriate & easy way for deployment of ONVIF event notification, which spares the users the effort from (1) having more IT/network knowledge (2) knowing the exact IP locations of camera and the NVR, in order to use event notification.
Furthermore, requiring users to turning firewall off even in production environment is controversy, we will not recommend users to do that.
For all the reasons stated above, we don't plan to add basic notification to Genius Vision NVR.
How to implement ONVIF Pull-point style event notification (ET01)
Warning! This is an implementation hint article. Read this first.
Calling sequence
- This sequence only applies when Event.Template (explained here) is set to ET01.
- Calls CreatePullPointSubscription
- Repeatedly calls to PullMessage to get notification message. Notification schema is consolidated at here. (Please pay attention to ET01, which is gathered from the spec)
How to implement MotionAlarm (motion detection) event (ET01)
Warning! This is an implementation hint article. Read this first.
Calling sequence
- This sequence only applies when Event.Template (explained here) is set to ET01.
- Engage event notification sequence.
Event definition
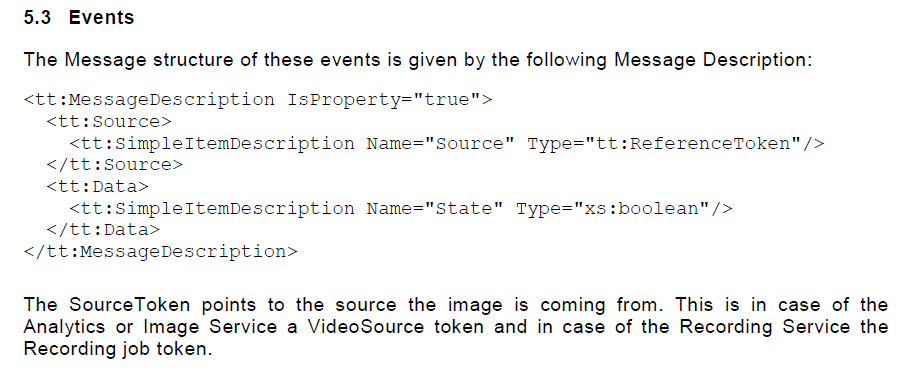
ONVIF-Imaging-Service-Spec-v221.pdf

Message XML example
<wsnt:NotificationMessage> <wsnt:Topic Dialect="http://www.onvif.org/ver10/tev/topicExpression/ConcreteSet"> tns1:VideoSource/MotionAlarm </wsnt:Topic> <wsnt:Message> <tt:Message UtcTime="2008-10-10T12:24:57.321Z"> <tt:Source> <tt:SimpleItem Name="Source" Value="[videoSourceToken]" /> </tt:Source> <tt:Data> <tt:SimpleItem Name="State" Value="[motionState]" /> </tt:Data> </tt:Message> </wsnt:Message> </wsnt:NotificationMessage> |
- [videoSourceToken]: Must match one of the tokens returned by GetVideoSources
- [motionState]: true if motion is in progress, false if not.
See also
What is Property in the context of ONVIF event? What is SetSynchronizationPoint? How should this be implemented?
Warning! This is an implementation hint article. Read this first.
Introduction of Property in spec
Property, as described in ONVIF-Core-Specification-v230.pdf, is a simplified way to represent status change by ONVIF event notification mechanism:
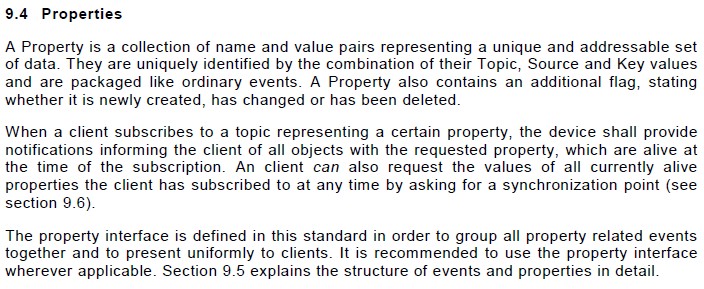
Property operations
According to the spec, there are three kinds of property operation, Initialized, Deleted, and Changed:


What is a Synchronization Point
According to spec,

Notice the red highlighted text, a Synchronzation Point is requested automatically when CreatePullPointSubscription is requested. What it really means is that the NVC (client) does not need to issue SetSynchronizationPoint explicitly.
Does the NVC (client) need to send SetSynchronizationPoint explicitly
No.
Please refer to previous section. This is clearly defined in spec without ambiguity.
What does it really mean by Synchronization Point, I still don't understand
The ONVIF specs tend to get very technical about some pretty simple concepts. What you really need to do is that after receiving CreatePullPointSubscription request, NVT should treat the client doesn't know anything about the current device status. Therefore NVT should send all (subscribed) properties with their states to the client, with PropertyOperation="Initialized" in NotificationMessage. This way the client would know the initial state of each subscribed property.
For example, say a digital input is at ON state. When an NVT received CreatePullPointSubscription request from client, it should immediately send the ON state event to client (with PropertyOperation="Initialized"), so the client wouldn't wrongfully assume the digital input state is at OFF state (because the client is not told the correct information).
If NVC doesn't need to send SetSynchronizationPoint, then what's the point of having such a command
According to spec:
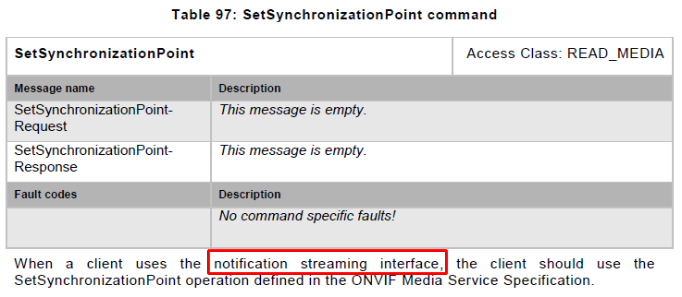
The SetSynchronizationPoint command is reserved for notification streaming interface (what is this?). Genius Vision NVR uses exclusively Pull-Point style event notification, so this command is never called by Genius Vision NVR.
What is notification streaming interface?
According to spec (ONVIF-Core-Specification-v230.pdf),
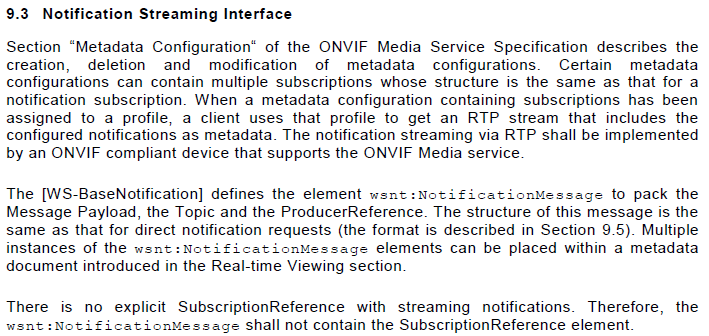
This special type of notification interface works in conjunction with RTP/RTSP, in which the NVT embeds notification packet inside RTP packets. Genius Vision NVR does not currently support this type of notification interface.
How to implement Digital Input (ET01)
Warning! This is an implementation hint article. Read this first.
Calling sequence
For ONVIF digital input function, the calling sequence of Genius Vision NVR can be summerized as follows:
- This sequence only applies when Event.Template (explained here) is set to ET01.
- Calls <device>GetDigitalInputs to obtain number of input and their tokens. If failed, NVR will try to call <ver10/deviceio>GetDigitalInputs.
- Engage event notification sequence.
Reflecting digital input state change
Event definition in spec
ONVIF-DeviceIo-Service-Spec-v221.pdf
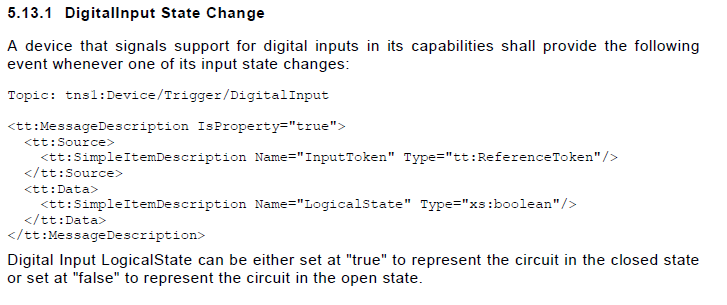
Message XML example
<wsnt:NotificationMessage> <wsnt:Topic Dialect="http://www.onvif.org/ver10/tev/topicExpression/ConcreteSet"> tns1:Device/Trigger/DigitalInput </wsnt:Topic> <wsnt:Message> <tt:Message UtcTime="2008-10-10T12:24:57.321Z"> <tt:Source> <tt:SimpleItem Name="InputToken" Value="[digitalInputToken]" /> </tt:Source> <tt:Data> <tt:SimpleItem Name="LogicalState" Value="[digitalInputState]" /> </tt:Data> </tt:Message> </wsnt:Message> </wsnt:NotificationMessage> |
- [digitalInputToken]: Must match one of the tokens returned by <device>GetDigitalInputs or <ver10/deviceio>GetDigitalInputs.
- [digitalInputState]: true if ON, false if OFF.
See also
How to implement Relay Output (ET01)
Warning! This is an implementation hint article. Read this first.
Calling sequence
For ONVIF relay output function, the calling sequence of Genius Vision NVR can be summerized as follows:
- This sequence only applies when Event.Template (explained here) is set to ET01.
- Calls <device>GetRelayOutputs to obtain number of input and their tokens. If failed, NVR will try to call <ver10/deviceio>GetRelayOutputs. This automatic protocol version detection will be remember in an internal variable called RelayUseDevIO.
- Engage event notification sequence.
- If relay is operated by user to switch ON or OFF, NVR will call <device>SetRelayOutputState or <ver10/deviceio>SetRelayOutputState, depending on RelayUseDevIO.
Reflecting relay state change
Event definition in spec
ONVIF-DeviceIo-Service-Spec-v221.pdf
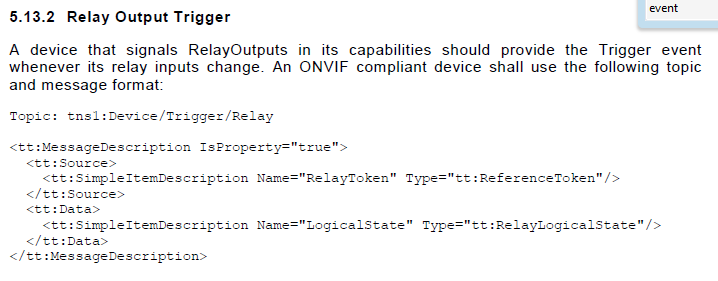
Message XML example
Relay output state is reflected using notification events.
<wsnt:NotificationMessage> <wsnt:Topic Dialect="http://www.onvif.org/ver10/tev/topicExpression/ConcreteSet"> tns1:Device/Trigger/Relay </wsnt:Topic> <wsnt:Message> <tt:Message UtcTime="2008-10-10T12:24:57.321Z"> <tt:Source> <tt:SimpleItem Name="RelayToken" Value="[relayToken]" /> </tt:Source> <tt:Data> <tt:SimpleItem Name="LogicalState" Value="[relayLogicalState]" /> </tt:Data> </tt:Message> </wsnt:Message> </wsnt:NotificationMessage> |
- [relayToken]: Must match one of the tokens returned by <device>GetRelayOutputs or <ver10/deviceio>GetRelayOutputs, depending on RelayUseDevIO.
- [relayLogicalState]: active or inactive, reflecting actual relay status.
Changing relay state
- Camera must implement <device>GetRelayOutputs or <ver10/deviceio>GetRelayOutputs in order to indicate its support to relay ouptuts.
- Camera must implement <device>SetRelayOutputState or <ver10/deviceio>SetRelayOutputState in order to be able to change relay state.
- The version of spec implemented by the relay output commands must be consistent.
See also
What is the InitialTerminationTime issue
Warning! This is an implementation hint article. Read this first.
Relevant spec hints
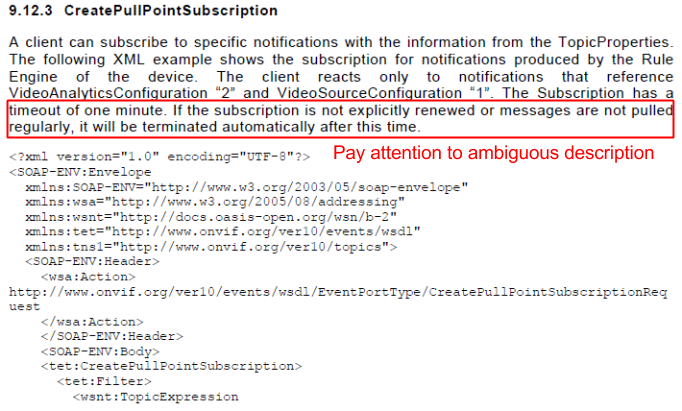
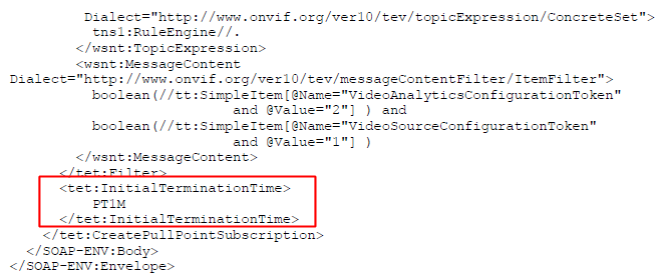
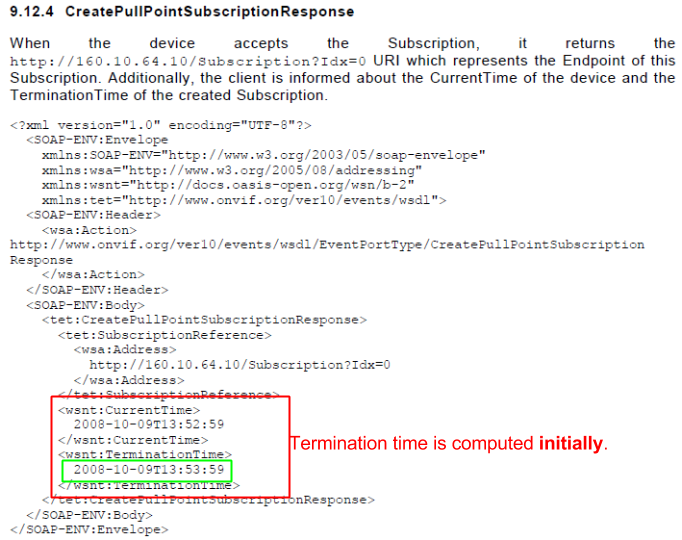
The meaning of InitialTerminationTime in CreatePullPointSubscription command is not very clearly defined in the spec. However it can be roughly interpreted as:
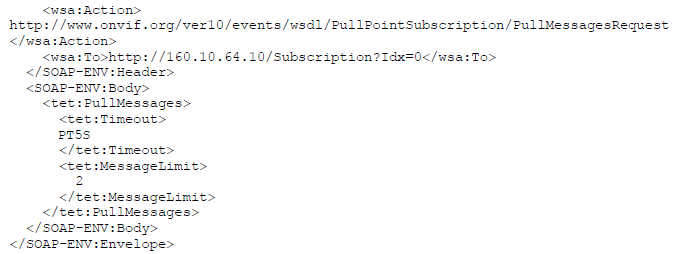
- If InitialTerminationTime defined in relative time, the camera should automatically extend the actual termination time by the value specified with InitialTerminationTime each time the camera respond to a PullMessageRequest.
Status
- Due to the principle stated here, in later versions of NVR software, an new template ET02 is added to accomodate this particular blurred spec issue.
Technical details
This interpretation can be extrapolated by following spec reading (ONVIF-Core-Specification-v230.pdf, with annotation in colors):
